
At this point, I have the motivation to become a Qlik Sense developer, a basic understanding of HTML, CSS and JavaScript and rudimentary knowledge on how to create a simple Qlik Sense extension. The only piece I’m missing is an idea about what great purpose my first Qlik Sense extension would serve.
I thought about creating a 4-dimensional bar chart and make my Calculus IV professor proud. Another idea that came to mind was to create an extension that develops itself so I would never have to develop an extension again. Lastly, I got a random message some Saturday afternoon (because we have nothing better to do) from Julian Villafuerte taunting me and begging me to help him develop an idea he had for a sheet in his very cool Qlik Sense app about Mexico City’s bike-sharing program.
Obviously, I went with Julian’s idea, and here’s the story how it came to be.
The Iterative Development Process
Before I explain the lessons I learned and share a few tips, let’s review the iterative development process between Julian and me. It was a great collaboration between a Qlik Sense Developer and a Qlik Sense Data Architect / Business Analyst that’s worth replicating.
Step 1, the idea originated from a requirement that Julian couldn’t fulfill using Qlik Sense native objects and any existing visualization extension in Qlik Branch. He wanted to include an object that used Google Maps to show street-level detail and route information. He had already done some investigation and had a rough idea what he wanted, which helped me get started in the right direction.
Step 2, I accepted his challenge and created a prototype to test the technical feasibility of adding Google Maps to a Qlik Sense extension . I read a bit about the Google Maps API that Julian had sent me and copied example code from this documentation into a simple Qlik Sense Extension. I tested it in a Qlik Sense demo and sent the following results back to Julian to get more detailed information about what he wanted.
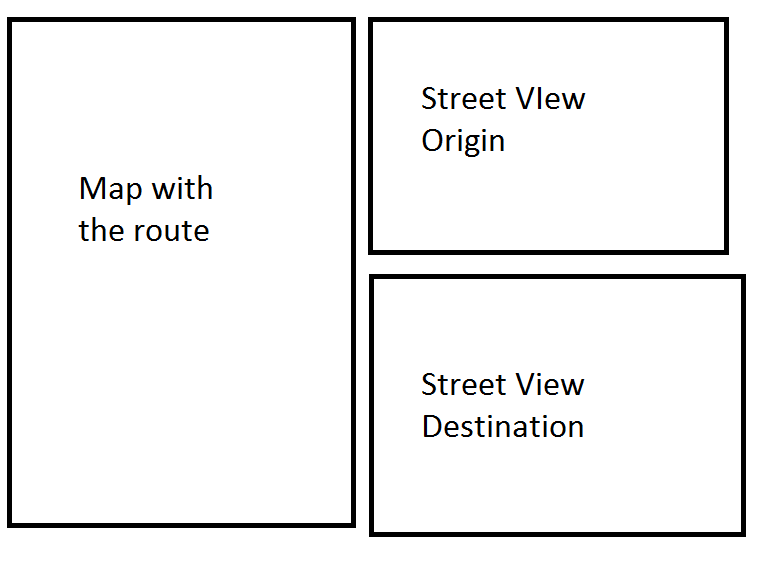
 Step 3, Julian explained what he needed in greater detailed and sent me the following wire frame. I also got access to develop and test the extension in the actual Qlik Sense app where he was going to use it.
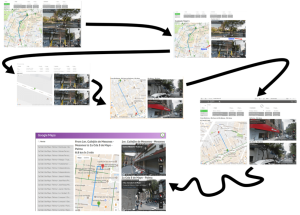
Step 4, as I pieced together the extension and added the street view, overall map, route, and distance from various Google Maps APIs, I sent Julian the progress. He in turn tested the extension and sent me his feedback. It was a windy road over four weeks.
Step 5, at a certain point when the extension’s functionality worked as designed, Julian took over and made the final aesthetic adjustments to the HTML and CSS. He transposed the map elements and changed the font size and color. I had to point him in the right direction to know what files to change, but he was able to make the adjustments himself without my help. I would assume the same holds true for most Qlik Sense Data Architect / Business Analysts. HTML and CSS are easy languages to learn, and easier to adjust.
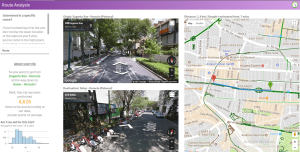
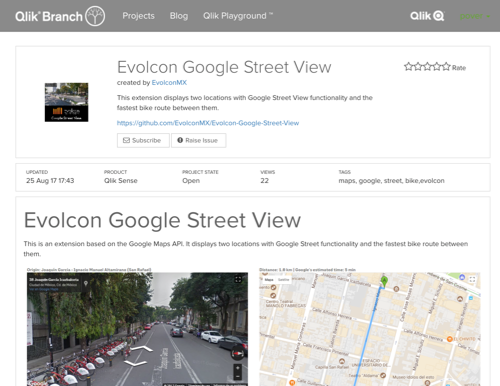
In the end, I learned from this process how a Qlik Sense Developer and a Qlik Sense Data Architect / Business Analyst can collaborate to create a great Qlik Sense app. You can download resulting Qlik Sense extension called Evolcon Google Street View from Qlik Branch. Also, if you haven’t done so already, you can learn more about the rest of Julian’s Qlik Sense app about Mexico City’s bike-sharing program, or Ecobici, in his blog.
Technical Lessons Learned
I didn’t really learn web development or Qlik Sense extension development until I created my own extension. Here are some of the things I learned in practice that the books and tutorials didn’t teach me.
The Hard Refresh
Qlik Sense extensions stick to a browser’s cache like gum sticks to shoes. This is great for people who use an extension, but horrible for the developers who create them. At the start, I found myself stuck in an infinite loop of changing something in my extension, hitting refresh, and seeing no change. I then learned that you had to clean the browser cache to see the changes, but who wants to have to clean the browser cache after every change. Finally, I discovered how to do a hard refresh and my life was never the same.
JavaScript Libraries and APIs
As much as I read about core JavaScript, HTML and CSS, I will likely never create any Qlik Sense extension without using an external JavaScript library like D3.js or an API to some third-party tool like Google Maps APIs. I’ve come to believe that the more libraries and APIs that I learn to use, the richer my extensions will become. For my first Qlik Sense extension, I read up on Google Maps APIs and used everything I learned up to this point to decipher and customize the example code. The next step in my process to be a Qlik Sense developer is to look for on-line resources that talk about the latest and greatest in web development, and I hope to find new JavaScript libraries to explore.
The Google Maps APIs and RequireJS
In my previous blog post, I explained the challenge I had with RequireJS when I followed the Qlik Sense Extension tutorial. I had yet another issue when trying to add Google Maps APIs to my first extension through RequireJS. Luckily, Miller Medeiros developed a solution and documented how it works on his blog. In short, I copied async.js to my extension folder and then added the following string to the module array. (Generate your own Google API code and use it to replace myAPIKey.)
[js]define( [ …,
"./async!https://maps.googleapis.com/maps/api/js?key=myAPIKey&callback=initMap"
],…[/js]
Add HTML in the Easiest Way
After learning to use jQuery to add HTML tags as a chain of functions, I got carried away and tried to use this method to create the HTML layout for my first extension. After several failed attempts, I discovered that it was better to keep things simple by writing out the HTML to a variable and then use one jQuery append() to add it all in one large swoop.
[js]
divs += "<div id=’left_column’>";
divs += "<div class=’desc_wrapper’><div class=’desc’>" + originLabel +"</div></div>";
divs += "<div id=’pano_origin’></div>";
divs += "<div class=’desc_wrapper’><div class=’desc’>" + destinationLabel + "</div></div>";
divs += "<div id=’pano_destination’></div>";
divs += "</div>";
divs += "<div id=’right_column’>";
divs += "<div class=’desc_wrapper’><div class=’desc’ id=’distance_time’></div></div>";
divs += "<div id=’map_route’></div>";
divs += "</div>";
$element.append(divs);
[/js]
Just Upload it to Qlik Branch Already
There’s something about uploading your first extension to Qlik Branch and exposing yourself to the world. In this case, Julian actually had to do some virtual hand-holding and help me do it. It’s definitely not perfect, but if I can help someone learn how to create their own extension using Google Maps API that is great. If something finds a problem that I can learn from and fix that’s also great. So without further ado, here’s my first Qlik Sense extension!
One More Thing…
 Don’t be modest or shy and apply to become a Qlik Luminary 2018 by December 31st. It’s a great opportunity to meet a wonderful group of people from all over the globe.

Leave a comment