In my previous post about my company’s migration to Qlik Sense Cloud Business, I described my frustration about having to manually upload data to my company’s workspace. I also expressed my belief that Qlik Sense Cloud would grow as fast as Qlik could develop data connectors for it. In his comment to the post, I think Aaron Couron summarized this sentiment well.
“I have to extract the data manually from the database into a file (qvd or otherwise) and put it up on the cloud. I guess that is an issue with any cloud vendor where I have on-premise data to feed it, but because BI, in general, relies so heavily on these kinds of resources, it becomes the “Elephant in the Room”.”
At some point, Qlik looks prepared to make this elephant disappear by adding the myriad connectors it acquired from Industrial CodeBox. Since December 2016, you can extract data directly from Salesforce and just last week Michael Tarallo posted a quick preview of the soon-to-be-released REST connector in Qlik Community. He also purposed a neat way to upload text files from Dropbox through it.

In the meantime, I’ve created a temporary solution to automatically upload data files using a robot. I finished it two weeks ago and it has run well 80% of the time. Barry Harmsen experimented with using a robot in Qlik Sense Cloud to invite users in November 2015. In a comment to the previous post, he shared his experience and remarked about the hassle it was to maintain the robot given how often Qlik Sense Cloud changed its UI flow and even the names of its UI elements. A year and a half later, I assume there are less drastic changes. Over the last 2 weeks, the few issues I’ve had were because my script was in need of some fine tuning and were not due to any change in Qlik Sense Cloud. Regardless, I’ll keep you up to date on the feasibility of using a robot while we wait for a more permanent solution.
Of course, the permanent solution is using a data connector to automatically refresh data directly in Qlik Sense Cloud. I recommend that you stayed informed about Qlik Sense Cloud updates, and that you swap the robot for a connector when the one you need becomes available. While we wait, I will do my best to keep the core script that I share in this post up to date in GitHub, and I will also show you how to maintain it yourself.
The steps we are going to take to create the robot are the following.
- Set up Selenium Webdriver
- Set up AutoIT
- Configure the AutoIT and Selenium code to your environment
- Create and schedule a Windows Task
Before last week, I had never heard of Selenium or AutoIT, so you don’t need to have any previous experience to go through these steps. It took me about 8 hours to get everything up and running including the time I invested in researching which tools to use and creating the script from scratch. I hope that people can be up and running in less than 4 hours with the help of this guide.
Set Up Selenium Webdriver
Selenium is an open-source software that lets you replicate a user’s interaction with a web-based application. It principal purpose, like Apache JMeter, is to automate web-based application testing, but we can also use it to automate repetitive web-based tasks. Selenium allows us to control the browser (eg. navigate to a particular website) and interact with HTML elements based on their attributes (eg. click on a button whose ID is “import-data”). However, it does not give us control over the whole Windows GUI. That is why we are going to have to use AutoIT to interact with a Windows Dialog Box that we use to select the files we want to upload to Qlik Sense Cloud.
In Selenium, you can use a variety of languages (Java, C#, Ruby, Python, JavaScript) to create a test case. We’ll use Java to automate the data file upload to Qlik Sense Cloud. You can also use any web browser to run the script. For this example, we are going to use Firefox because Selenium provides a plugin to record user interactions that we can convert to Java. If you don’t have Firefox, download and install it.
You can find the rest of the steps to set up the entire Selenium developer environment from scratch at http://toolsqa.com/selenium-webdriver/download-and-install-java/. The following image is a screenshot of the site. Go through the first 6 steps to set up Java, Eclipse, and Selenium Webdriver Java Client. I installed everything on my server. However, you should also be able to set up the developer environment on your personal laptop and install only Firefox, Java, and the GeckoDriver in your server.

In Configure Eclipse with Selenium WebDriver you create your first java project. After that, follow the instructions in Running Test on GeckoDriver before going creating your First Test Case. The first test case will help you debug any problems with your environment before adding the code that I’m going to share with you later in this post.
Once you are able to run your first test case then the next step is to set up another automation tool that can work with Windows Dialog Boxes.
Set Up AutoIt
AutoIt is freeware that mimics a user’s action in the Windows GUI. We will use it to find a Windows Dialog Box and simulate keystrokes. In your developer environment, download and install the AudIt Full Installation. The installation is quite straight forward. Once that is installed then we are now ready to configure and test the code to upload data files to Qlik Sense Cloud.
Customize Code
We are going to add the necessary code to automate the file upload in two parts. We’ll first configure the AutoIt code to manipulate the Windows Dialog Box and then we’ll adjust the Selenium Webdriver code that navigates through Qlik Sense Cloud.
AutoIt
Open SciTe Script Editor from the start menu and paste the following script.
;;Wait 5 seconds for the File Upload window to appear
WinWait("File Upload", "", 5)

;;Paste location of folder where data files are locally stored (Text limited to 259 characters)
ControlSetText("File Upload", "", "[CLASS:Edit; INSTANCE:1]", "D:\YourPath\QVDs")

;;Wait 1 second to finish pasting text
Sleep(1000)

;;Hit Enter and go to folder where data files are locally stored
ControlSend("File Upload", "", "[CLASS:Edit; INSTANCE:1]", "{ENTER}")

;;Wait 5 seconds to go to folder
Sleep(5000)

;;Paste list of data files to upload (Text limited to 259 characters)
ControlSetText("File Upload", "", "[CLASS:Edit; INSTANCE:1]", '"Worklogs.qvd" "DocumentTypes.qvd" "INV1.qvd" "ITR1.qvd" "JDT1.qvd"')

;;Wait 1 second to finish typing
Sleep(1000)

;;Hit Enter and upload data files
ControlSend("File Upload", "", "[CLASS:Edit; INSTANCE:1]", "{ENTER}")
In short, the code first waits for the “File Upload” window to appear. It then goes to the directory where the data files are located, and finally, selects the date files you want to upload. You define the folder where your data files are located in line 5 and the list of data files to upload in line 17. I’ve highlighted both lines in the previous code snippet. You can also go through the code’s comments that begin with two semi-colons (;;) to get an idea of what each line does in more detail.
Note: If you are uploading a large number of data files and the list is longer then 259 characters then you can either make the file names shorter or run this script twice from the Selenium code that we are going to see in the next section.
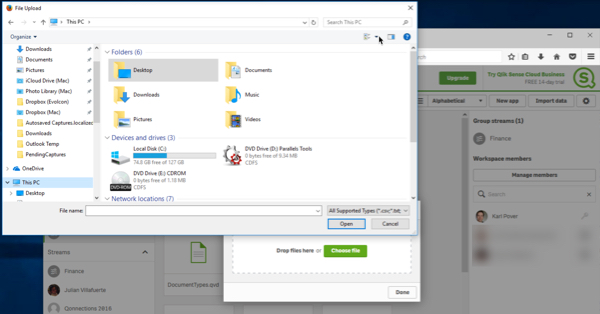
Once you adjust the code to upload your files, go to the File Upload window in Qlik Sense Cloud as shown in the following image. Then go to the SciTe Script Editor where you have your modified code and press F5 to run the script. If everything works correctly, you will see the text being entered into the File name text box and the files being uploaded.
If nothing happens then the script may not be able to find the window. If you are using a language other than English, you will have to change the window’s name in the code. For example, in a Spanish-enabled browser, you would replace File Upload with Archivos de cargar like in the following line of code.
ControlSend("Archivos de cargar", "", "[CLASS:Edit; INSTANCE:1]", "{ENTER}")
Once you confirm that your AutoIt code is working, save the script file (.au3) wherever you prefer. In order to run it from Selenium Webdriver, we also have to compile the script and save it as an executable file (.exe). In the SciTe Script Editor go to Tools -> Compile. Now go to the directory where you saved the .au3 file and you will see a .exe file with the same name. We will use this file in the next section.
Selenium Webdriver
You can either replace your first test case’s script with the following script, you can paste it in a new project in Eclipse. If you don’t remember how to create a new project then go to Configure Eclipse with Selenium WebDriver.
[java highlight=”1,10,14,27,31,47,56″]
package automationFramework;
import java.io.IOException;
import java.util.concurrent.TimeUnit;
import org.openqa.selenium.By;
import org.openqa.selenium.WebDriver;
import org.openqa.selenium.firefox.FirefoxDriver;
public class FileUpload {
public static void main(String[] args) throws InterruptedException, IOException {
// TODO Auto-generated method stub
System.setProperty("webdriver.gecko.driver", "C:\\\\YourPath\\geckodriver.exe");
// Create a new instance of the Firefox driver
WebDriver driver = new FirefoxDriver();
// Help to not always rely on sleep function to wait
driver.manage().timeouts().implicitlyWait(10, TimeUnit.SECONDS);
driver.manage().timeouts().pageLoadTimeout(100, TimeUnit.SECONDS);
//Launch the Qlik Cloud Log In
driver.get("https://qlikid.qlik.com/cloud");
//Make sure the text box is clear and type account username
driver.findElement(By.id("MemberLoginForm_LoginForm_QUsername")).clear();
driver.findElement(By.id("MemberLoginForm_LoginForm_QUsername")).sendKeys("john.doe");
//Make sure the text box is clear and type account password
driver.findElement(By.id("MemberLoginForm_LoginForm_qPassword")).clear();
driver.findElement(By.id("MemberLoginForm_LoginForm_qPassword")).sendKeys("123456");
//Submit Username and Password
driver.findElement(By.cssSelector("input.qlik-submit")).click();
//Wait for 5 Sec
Thread.sleep(5000);
//Sometimes sent to Qlik.com, so make sure we’re in Qlik Cloud
driver.get("https://us.qlikcloud.com/hub/personal");
//Wait for 5 Sec
Thread.sleep(5000);
//Go to Workspace
driver.get("https://us.qlikcloud.com/hub/groups/myWorkSpaceID");
//Click Import Data Button
driver.findElement(By.id("import-data")).click();
//Click Upload Button
driver.findElement(By.id("uploadTrigger")).click();
//Run AutoIT script to select files from File Upload Window
Runtime.getRuntime().exec("C:/MyPath/AutoItScript.exe");
//Wait for 30 Sec
Thread.sleep(30000);
//Click Upload Finished
driver.findElement(By.id("done-upload-file")).click();
//Log out
driver.get("https://us.qlikcloud.com/logout");
//Wait for 5 Sec
//Thread.sleep(5000);
// Close the browser window
driver.quit();
}
}[/java]
You can get an idea what each line of code does by reading through the comments. I’ve also highlighted the lines that you need to adjust to your environment.
On line 1, change the package name to whatever name you gave it when you created the project in Eclipse.
package automationFramework;
On line 10, Eclipse will prompt you to change the public class name or the java file name. Do as you like.
public class FileUpload {
On line 14, change the file path to where you saved geckodriver.exe.
System.setProperty("webdriver.gecko.driver", "C:\\\\YourPath\\geckodriver.exe");
On line 27 and line 31, add your Qlik Sense Cloud username and password. The code does not encrypt the password in its current version, but I assume it is somehow possible.
driver.findElement(By.id("MemberLoginForm_LoginForm_QUsername")).sendKeys("john.doe");
driver.findElement(By.id("MemberLoginForm_LoginForm_qPassword")).sendKeys("123456");
On line 47, replace the current URL with that of your own workspace. The easiest way to do this is to manually log in to your Qlik Sense Cloud account, click on your workspace, and copy the URL. The ID will be some alphanumeric string.
driver.get("https://us.qlikcloud.com/hub/groups/myWorkSpaceID");
On line 56, change the file path to where you saved the AutoIT script executable file we created in the previous section.
Runtime.getRuntime().exec("C:/MyPath/AutoItScript.exe");
Once you have finished those modifications then save the code and run the script. If everything goes smoothly, you should see something like the following video. (It takes less than one and a half minutes.)
It probably won’t go so well on the first run, and you’ll likely have to adjust or add sleep times to both the Selenium script and the AutoIt script. Pay special attention to the sleep method on line 59. This is the estimated time that you expect it to take to upload the data file, so add a little extra time just in case the connection speed is a slower than usual.
Add New Code
If there is ever a change to the Qlik Sense Cloud UI, or if you want to add an additional action to the script, the easiest way to do that is with the help of the Selenium IDE Plugin for Firefox. You can find the link to download it in the Selenium download page.

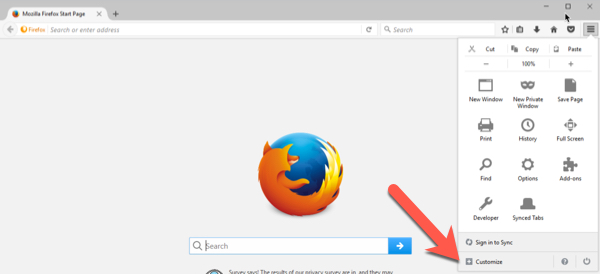
Go to the Mozilla Add-ons page of Selenium IDE and select to the option to add it to Firefox. After installing the add-on, you’ll have to restart Firefox. Once Firefox restarts, you can customize the menu and make Selenium readily available to open. Once you go the customize option, you can place the Selenium IDE icon anywhere in the menu.
Now if you go to Qlik Sense Cloud and select Selenium IDE, an additional window will open that will start to record your actions. Selenium IDE should start to record as soon as it opens, but if not, you can toggle the record on and off in the top-right corner of the Selenium IDE window.
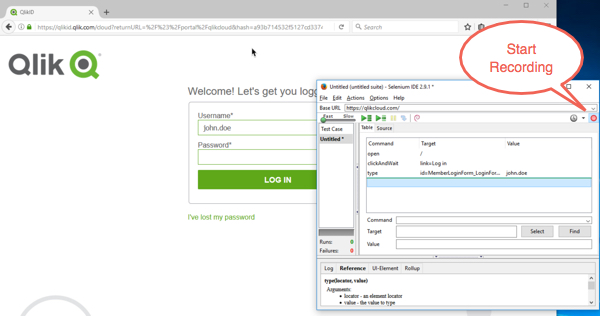
As you go along clicking objects and typing, you should see your list of actions reflected in the table. You can stop recording at any time and play back these actions to test whether they were recorded accurately.
Selenium IDE records everything in HTML by default. We can change the script language when we copy and paste new code into Eclipse by changing the clipboard format to Java. You can then select one or more lines in Selenium IDE, copy them, and paste the new action or series of actions as Java into Eclipse.

In that way, you can update your script without being a Java expert in case the Qlik Sense Cloud UI changes or in case you want to add a new action.
Schedule The Job
After you have adjusted your code for your environment and successfully run your script manually, it is time to automate the process. I suppose you can use any job scheduler software to do so, but in this case, we’ll use the one that almost everybody has, Windows Task Scheduler.
There is more than one way to run your script from Windows Task Scheduler. In this example, we are going to create a runnable jar file and run it from a batch file. First, open your project in Eclipse and export your code as a runnable jar file. Then, open your favorite text editor, include the following command into the text file, and save it as a batch file (.bat).
java -jar "C:\YourPath\UploadDataFiles.jar"
Before moving on to create a Windows task, test the batch file by double-clicking on it and making sure the script runs. In some cases you may have to right-click the batch file and select Run as administrator.
Once the batch file runs correctly, go to Windows Task Scheduler and create a task. In the General tab of the Create Task… wizard, select the options to Run with highest privileges and Run only when user is logged on.

We cannot run this task when the user is logged off because the script needs to interact with the GUI. This doesn’t mean you have connect to the server at 3am in order to run the task. A user can be logged on, but disconnected at the same time. For example, if you are using Remote Desktop to connect to a server, you can disconnect from the server and the task will run. However, if you log off from the server then the task will not run.
In the Triggers tab, define the task trigger that best serves your purpose.
In Actions tab, add the action to Start a program and select the batch file.

Once you’ve created the task, remember to test it by running it manually before leaving it to trigger automatically. If you are connected to a server, remember to disconnect from it and to not log off when you are finished. I have not tested it on a laptop, but it should also run if you are still logged on, but the laptop is locked.
One More Thing…
Surely there are numerous improvements that could be made to this solution, but again, this is a temporary solution while we wait for Qlik to add more data connectors to Qlik Sense Cloud. If you have any tips or recommendations, feel free to leave a comment or start a branch of the code in GitHub. I’ll also keep the script up to date if the Qlik Sense Cloud UI changes.
Even though this is a temporary solution, I had a lot of fun learning new tools and creating a working solution to fix a real problem. I’m going to take that momentum and finally tackle creating a Qlik Sense visualization extension. A recent blog post on Qlik Branch about hacking together a Qlik Sense visualization extensions gives me hope that I can and I’ll share my adventure in doing so in the next post.
Karl

Leave a comment